Front lip update – base + clear coat

The struggle behind this whole episode is a long story, but I finally got so pissed that I painted the whole thing by myself. I didn’t have any previos experience with spray guns, but overall, the result is satisfying. I think I got lot better in painting towards the end.

There is still some minor details, like sanding the thing with 2000-grit paper and then polishing it with paste, but otherwise it is ready.

Things I find evil after this: Clear coat. Sprayable airborne poison which sticks to everything and is impossible to clean. And I had to do two layers.

Things I love after this: Gas mask. I’d be dead without this.

Base coat:

IMAG0388

First layer of clear coat:

IMAG0393

Second layer of clear coat:

IMAG0396

I think the front lip has too much imperfections, so no close-ups ๐Ÿ™‚

Crank pulley findings

IMG_5035

Couple of weeks ago, I was looking my spare engine, wondering what to do with it.

I don’t know why I started to look the tensioning pulley and how weird it looked when compared to the another one. Then, suddenly, I couldn’t find the timing stick anywhere.

I looked and looked but it was missing. I had to go and check the still intact engine in the AW11 to look for the timing stick (or pin? needle? whatever).

Well, it indeed was missing. It was sawed off. Looked like it was too close to the crank pulley. WHAT?

Shouldn’t the crank pulley be small enough to rotate without anything sawed off? I started to look for a tape measure, because something seemed to be out of place. I measured the smaller diameter first, and it was 130mm, which was normal. Then, the bigger one, which was 165mm.

Funny, it should be 145mm. Except… this is the HKS crank pulley! Looks like the stock one, but it is 20mm larger.

Wow! I was really surprised! It’s not the largest pulley available (well, the HKS pulley is already discontinued), but there is still at least pulley kits from NST and TechnoToyTuning, if there is need for a bigger pulley. Still, I’m going to stick with this.

Gearbox and spare engine 2

My part of the garage started to look like a combined toyota parts warehouse and abandoned server room mashed together. Maladar is on the left, looking the chaos.

IMG_4912

Maladar was in good mood and we went and bought an engine stand for my spare engine

IMG_4915

We took off the gearbox and removed the clutch (or Maladar did, I took the pictures) ๐Ÿ™‚

IMG_4936

Maladar then wanted to have some quality time, so he molested my engine.

IMG_4956

Then he proceeded to make an autopsy for the engine and noted how it wasn’t dead. Camshafts looked suprisingly like new (and stock) which was quite strange. There were some marks of use, but nothing unusual (compared to a pair of SR20DET camshafts which Maladar got back from customer who hadn’t been reading the instructions)

IMG_4958

Some parts lying around: passenger side hub, part of Civic’s exhaust, catalytic converter, suspension parts and driveshafts for the manual gearbox.

IMG_4913

Still a mess

IMG_4970

Replacing catalytic converter with straight pipe

I recently found out that I don’t need a catalytic converter in my car. As an environmentalist, I thought it would be a great to swap a straight pipe in place of the catalytic converter (came with the spare engine and gearbox), so I decided to do it. ๐Ÿ™‚

First try was a bit sad. The second bolt tore its treads while Maladar tried to open it and I managed to tear half of the seal between the muffler and the catalytic converter. We decided to postpone the whole thing as we didn’t have a proper seal to replace the torn one. Altough the result was more aggressive exhaust note, I needed to get it fixed before MOT inspection (again).

Finally, with huge help from Maladar and a seal from Widric, the catalytic converter was finally taken off. I thought the cell inside the converter would have been busted years ago, but no. It was like a new. Wow.

Some pictures from the swap:

IMAG0334_1k

IMAG0336_1k

IMAG0337_1k

IMAG0338_1k

IMAG0339_1k

Suspension status update

CIMG0455

I’ve driven about 2000-2500km (I noticed that I had 105555km on the odo) with the current Toda setup, and it has been so hard, that everything else has felt like a magic carpet ride on fluffy clouds full of cotton candy.

Until now. The suspension starts to get bit softer! Maybe it has settled in ๐Ÿ™‚

…or not. Maybe my bushings are destroyed and it just feels like the suspension has settled.

It has been so hard, that I’ve been able to tell the color of road markings if I’ve been crazy enough to drive over those. Bridge gaps have felt like concussion and do I need to mention road works? End of the world as we know it.

Well, it’s not that hard, really. I think the 5kg/mm front and 10kg/mm rear is pretty good setup, and with proper tires, swaybars and bushings it’s going to be exceptional. I’ve collected a bunch of new rattling sounds around the cabin, but that’s nothing new. The car is 22 years old, so its about time to find some loose screws, nuts and bolts ๐Ÿ™‚

Pivot Compo-X gauges

I initially got a Defi gauge system for my car, just because it was available and the dial color was the same as the rest of the gauges in MR2. I just had the main unit and the boost gauge to check if the supercharger was faulty. It wasn’t. ๐Ÿ™‚

Then, one day when I was driving back from somewhere, Defi started to act weirdly and suddenly stopped working and I was, once again, without gauges. I took the wiring off my car and thought if there was way to check which was broken, the gauge or the main unit.

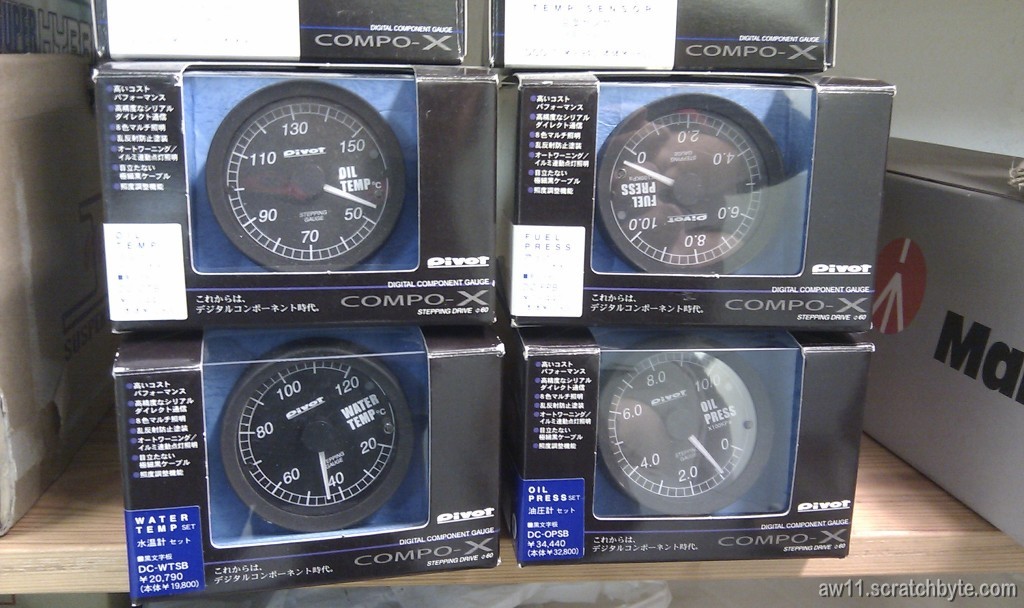
Maladar had some Pivot Compo-X gauges on the shelf, and I bought them and tried to forget the Defi. I only bought Boost and Water Temp, just because I didn’t have more money to spare at the moment. I was confident that I would buy the rest of the gauges later.

Much later I realized that I eventually would need the gauges, I asked Maladar about the rest. He looked me terrified and said that the Compo-X series wasdiscontinued.

๐Ÿ™

I think I looked every other brand from Japan (Greddy did look nice) but Maladar said that he couldn’t import it for me, which turned me towards AEM gauges.

AEM AFR Gauge:

30-5130

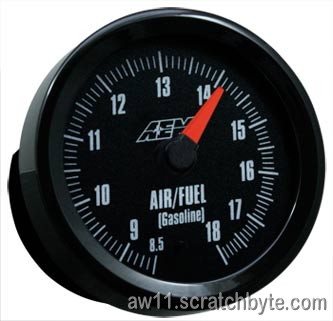
AEM gauges are pretty nice and there is a plethora of different models to choose from. Still, I think the looks are essential and AEM gauges give me a impression of the eighties. I do have the the needle version of the UEGO gauge, just because its quite close to the Pivot gauges.

Then, suddenly: I was visiting Mr. Sensei who promised to make me a subwoofer box between the seats. He noticed my gauges and asked where I did get them, because he thought he had similar gauges at his garage. My initial question was “are you sure?” followed with three more questions “which gauges? still in box? how much?”

Mr. Sensei had Water Temp, Oil Temp, Oil Press and Fuel Press! And he sold them to me! Wooooo! Wooooooooo! With sensors and everything! ๐Ÿ˜€

He told me, that he had just taped them once in his showstopper Civic and after that they had been collecting dust. All the wires were untouched and in mint condition.

I’m still missing Volt and EGT gauges, but I might get those from AEM.

The gauges:

IMAG0330

Later, I did find out which one was broken in the Defi system. It was the gauge. Beldin had a full Defi setup in his RX-7 and he had blown the main unit, which was replaced with my main unit.

Front lip update

Some progress with the front lip.

IMG_0138

I was going through the front lip with 400-grit sandpaper for the last time, so it would be ready for painting, when I suddenly noticed some hairline cracks on the primer. Further examining revealed that the glass fiber putty I had, was too thin to keep everything in shape. I was ready to give up of the whole painting thing and started asking silvery DiNoc from Maladar, so I could get at least something out of the broken thing. Maladar told me that no one stores silver DiNoc around here and I need to buy the whole 12-meter roll, which was quite expensive for the situation.

I was bit smitten. Next night I googled around various sites explaining methods to fix those hairline cracks. Most of the sites were about boats, and boats as well are made out of glass fiber. Most of the boats tend to hit things underwater, and experience same kind of problems. (With water gushing inside the boat, as a bonus)

Next day I decided to try out some of the guides and I grabbed Widric’s dremel. At least, I try to fix the largest cracks so the whole thing still stays together. Replica Buddy Club front wing costs about 29900 yen in Japan, which is about 300 euros without VAT, taxes and cargo, so if I screw up, I still can order the front lip. ๐Ÿ™‚